Before showing any more of my carvings, here are a few observations about the sharp things used for carving.
First safety. Oh no, not the safety police! Oh yes, but just for a bit.
Advice: don’t log onto a woodworking forum and ask why some of the experts there, who make video tutorials, advise wearing a carving glove, but don’t wear one in their videos.
 The carvers on that forum didn’t appreciate the question, and after a while got the thread not only locked, but completely removed.
In reality, the people who have been carving for a long time have learned how to avoid dangerous cuts that might lead to injury and how to precisely control all cuts. Most have advanced to the point of not needing carving gloves.
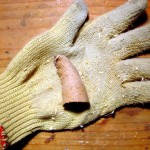
Beginners, however, definitely need all the protection they can use while learning to control their tools. Pictured are an inexpensive kevlar carving glove and a leather thumb guard. The carving glove is amazingly effective. It feels like a simple knitted glove, made of soft fabric. Yet it is very effective at stopping many kinds of blade strikes. It blunts the strike of the flat edge of the blade. It slows down, but does not completely stop, slicing actions, and it is almost useless for point jabs. The first sort of strike, the blunt full edge strike, is the most likely kind of mistake anyway, and the glove proves its value. For the last kind of strike, the point jab, if you are making that sort of cut, STOP. It’s too dangerous. Find another way to keep the point of a tool aimed away from your hands. Carving gloves can be found anyplace where carving knives are sold. They come in several grades, from simple kevlar fabric, to steel wire reinforced. A $10 glove is a lot cheaper than stitches at the emergency room.
I am right handed and wear the glove on my left hand, the hand that holds the workpiece. I have not had any cuts while using the glove and thumb guards. Ironically, I cut myself most when not carving, when sharpening. Now, the good thing about being cut with a really sharp edge is that it is so smooth that you barely feel the cut … and it is so smooth that the severed tissue fits back together very easily and heals very fast. (Don’t try this at home.)
My thumb guard isn’t often used, because I don’t often carve toward my thumb. Yet, when I do, I quickly put it on. It is just a bit of leather, a remnant from the leather used to line the jaws of my workbench vises.
As for learning to avoid dangerous cuts, Allen Goodman does an excellent job in his carving videos of pointing out dangers and showing how to avoid them. He’ll say, “Hey, this cut can be dangerous. Here’s how to control it.” Almost always, the technique is to add another touch point to the knife, such as using a second thumb, as a point of leverage or moderation.
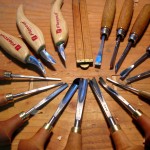
 My collection of knives and chisels has grown over time. I’m not about to make recommendations for specific brands and such because there is a huge variety and everybody has their own favorites. I will go so far as to suggest buying the best you can afford. The Ramelson chisels (upper right in the first photo) I bought long ago were marked as a beginner set. They are indeed entry level and will get you started. Yet, if you decide you like carving, you’ll want better tools quickly. I have nothing but good to say about the Flexcut knives and Pfeil chisels. They are very good quality, arrive sharp, and can be made sharper.
There is no such thing as too sharp.
 I have a big leather strop loaded with Veritas green honing compound. It is 24 inches long, originally made for honing plane blades. I use it with these knives and chisels. I’ve developed a habit. While carving, when I change from one knife to another, one gouge or another, I don’t return the tool to the rack. I leave it on the bench. After a carving session, every tool on the bench gets two dozen rides along the strop no matter how much or little I used it. Then, back to the rack. That habit keeps all of the tools very sharp.
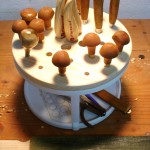
My tool rack is an inexpensive plastic lazy susan with a wood top, a simple afternoon’s project. Part of the strop is also in that picture.
Only two more points about tools. One: it is a real good thing to keep a bench between your tools and the floor. I used to carve while sitting on comfortable stool out in the boat shop. That shop has a concrete floor. It took dropping a chisel on concrete twice to learn to carve over a table. Two: One can wear a V-tool down to a nub while learning to sharpen it. The Ramelson V-tool was ground off center and my first efforts to correct it were woeful. In the end, a V-tool is only a combination of two chisels that meet at one corner. Sharpen each as an individual chisel. If that doesn’t work for you, Chris Pyle once published a 100 page e-book about “Selecting and Sharpening Your V-Tool.” (Update – Apr, 2011: This e-book is no longer available on Chris’s recently redesigned web site. A pirated copy is available from a Polish site, but you’ll have to find it yourself.)
Good post and these are some things I should probably think about. I always am very aware where the sharp pointy end is heading so I have avoided injury, but I always seem to draw a little blood somehow whilst carving. I must admit, that your opening image looks a lot like a carving glove and a severed finger at first glance. This impression makes the title very confusing but it definitely got me to click through from my blog reader. Thanks for the post.
Great advice. I wear a glove constantly when I carve – I feel naked without it. It’s like being in a car… I don’t feel right when I don’t have my seatbelt on.
Oh yeah – I cut myself yesterday – cutting my morning bagel – guess what – I was not wearing a glove – go figure.
Bob: Can you tell me what the Fiddlehead sail plan is like? Rig, spars, etc.? Thanks, Sam
Sam,
My Fiddlehead plans did not include a sailing option. Check with Harry Bryan, the designer here.