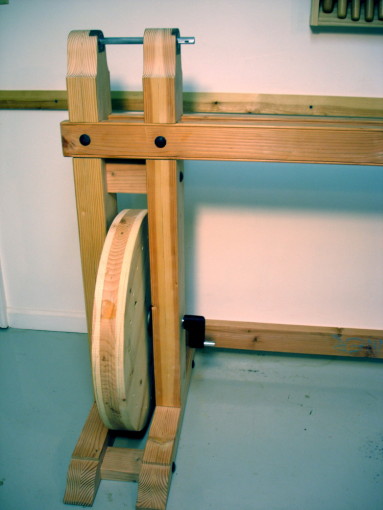
More spinning things! There are lots of little step-by-step things since the last time. Summarized, two axles are now running on ball bearings and held in an assembly of two legs. Simple.
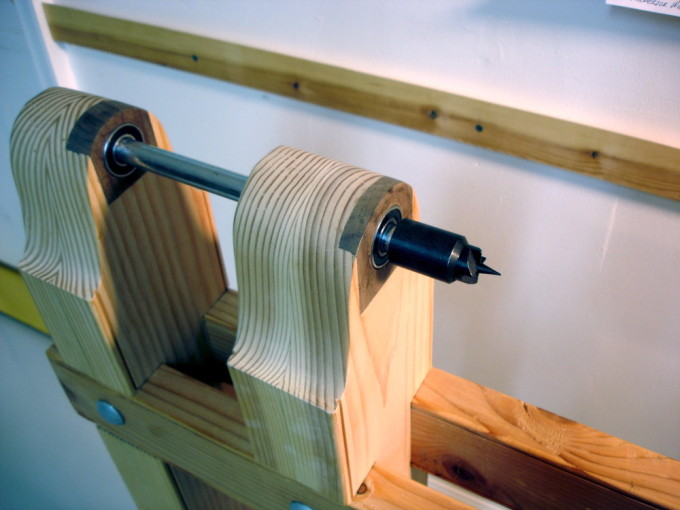
The left leg holds two bearing blocks. Both are set in only as deep as they need be. The flywheel axle and the headstock spindle do not run completely through the left leg. There’s a single bearing for the flywheel axle.
The headstock spindle has two bearings. Leftmost is a thrust bearing which absorbs lateral pressure on the spindle. Immediately next to it is a ball bearing for the radial load.
The flywheel axle is 1/2″ steel rod, common stuff from the home center. The headstock spindle is also common 5/8″ steel rod. I used that size because it is the same as a ShopSmith spindle and several parts are available for that size spindle (see the post 2 previous to this for actual part numbers).
The right leg, of course, has through holes for both the flywheel axle and the headstock spindle. The bearing for the flywheel axle is on the inside / left face of this leg, making both flywheel bearings close to the wheel itself. The headstock spindle bearing is on the outside / right face of the leg.
The legs are bolted together with 3 carriage bolts, each running thorough a spacer block, two through the feet and the third just below the rails. It’s solid!
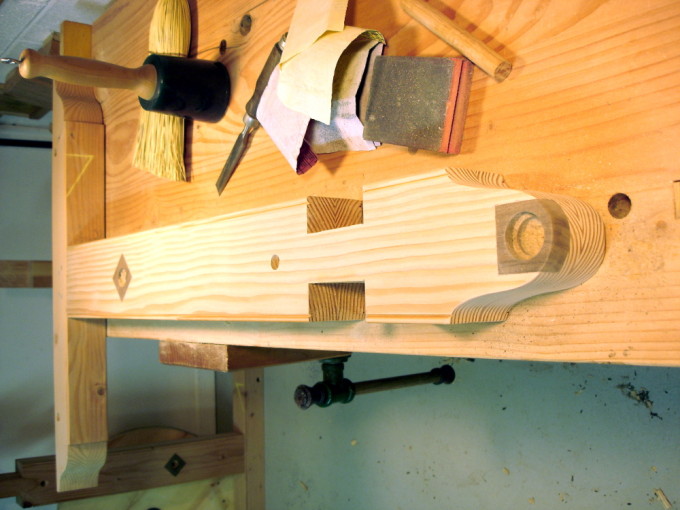
Last, there’s a crank piece made of walnut. Remember, the blacksmith moved away, and I don’t have enough metal working skills to bend cranks in 1/2″ steel rod. So, I used a block of walnut, and pinned it to the flywheel axle and the crank stub with pins made from 8-penny nails.
And… yes, that’s a pile of sandpaper (YIKES!) in one of those photos. Hate the stuff. But the wood needed it.
Result: Il meccanismo è molto scorrevole! (http://translate.google.com/#it|en| is your friend)


Your italian is very good.
Molto grazie Andrea!
My Italian is only that of a beginner. I use it like a monkey, performing only the tricks I have been taught. Someday, understanding might come.
THANK YOU for drawing my attention to your blog, L’angolo di spoglia inferiore, written in both Italian and English. It provides “parallel text” that language learners appreciate.
The lathe is looking great Bob. I’m looking forward to see what you come up with for the tool rest. I’m not so happy with mine on the spring pole lathe and am looking for improvements or different ideas. I must have missed where you fared those curves on the puppets, they came out great.
THANKS Joe,
I just saw your 2 most recent posts about your spring pole lathe. Have them in my “read real soon” queue.
I think I’ll use the tool rest Stephen Shepherd designed for the lathe. Haven’t built it yet, but will soon. It’s clearly different than yours, although I have no idea if that means “better.” 🙂
Believe it or not, whose curves were cut with a shopmade bow saw that weighs only about 8 ounces. They were then smoothed with a Nicholson rasp and (yech!) sandpaper.
Bob, I’m curious why the additional cross brace above the wheel and below the ways was added. Don’t the ways provide enough stability? Secondly how true is your wheel that that it is “hooked up” and running. Do you think you will need to do any balancing to get it running smoothly without vibration?
Good question Shannon!
The only answer I have is being a belt + suspenders kind of person. The lathe will probably work just fine without that piece, and if I ever want to run with a crossed drive belt that piece will be in the way and have to come out. Yes, the two base bolts and the bolt at the ways provides more than enough stability.
Secondly, now that it is all assembled, the wheel is not as round as it needs to be, and it’s currently a wee bit out of balance. One of the next things to do is to dig out an old Craftsman chisel, sharpen it, and get to work on the wheel. I’ll get it round first and defer the balance until I get all the treadling parts done.
I remember seeing somewhere that truing can be done by setting up a temporary tool rest set to the mid height of the mounted wheel then while someone else does the treadling, one could “turn” the wheel with a gouge. The end grain would be rough but I guess really no different than normal faceplate turning. This is a very distracting project as I have so many to do before I get on to this since the treadle is Hand Tool School semester 5 and semester 4 only begins Monday.
Sorry to distract you Shannon! :-}
Yes, that’s exactly how I intend to true it. I’ll be sacrificing some old dilapidated tool to grind it into a round nose scraper. Then, I’ll find a volunteer treadler.
Best wishes for the next semesters’ work!
I am really impressed by the your latheso far. I am planning to build a very similir lathe but I am trying to figure out how to incorporarate a drive spindal from a manufactured lathe that way I can use a morse taper drive center Do you have any thoughs on this?
Hello Chad,
My research found a LOT of treadle lathes. In all of that research, I have not yet seen a wooden frame lathe with the kind of drive spindle you want. That doesn’t make it impossible. It’s just something I haven’t seen.
My suggestion is to get the parts (or good measurements of the parts) you want to use and determine how to mount them in your post(s). Think about using a cord to transfer power, instead of a flat belt. That way, you can probably have the cord drive a traditional pulley.
Good luck with it, and let us know how it turns out!
Dear Bob,
Trying to find the exact same spindle that you used in the Hand Made Wood lathe.
I need one 12inches long. 1 1/4 inches. Have any ideas or know where this might be available. I’am building a bowl lathe.
Kind Regards
Bob Anthony.
Hi Bob,
The spindle itself is a cold rolled 5/8 inch steel rod, which I bought from a home center and cut to length. I was fortunate in picking up a piece that is straight and runs true. Shannon Rogers said he wasn’t as fortunate with simple home center stock and ordered a better piece from McMaster Carr.
The rest of the parts, bearings, etc. are noted in this post.
Enjoy your build!
Thanks so much for the quick response, i will check it out
BOB Anthony.