We’ve had plans and lams. Now we have gams. (Italian: la gamba = leg) OK, legs … and maybe some feet too.
Before I get started showing how I made rather big mortise and tenon joints, let me preempt a question. Someone is bound to ask why I didn’t make much easier half-lap cuts in some pieces before I laminated them. They would be so much easier than cutting big mortises. Simple answer: when I started laminating parts, I had a good idea of general dimensions, but had not yet decided on which style of lathe to make. Should it be one with the wheel sitting back behind the ways, or one with the wheel centered on the headstock? They have completely different construction.
I’ve decided. The lathe will have the wheel centered on the headstock, similar to those by Steve Schmeck and Stephen Sheppard (see the Plans and Lams entry). This makes the contraption a bit more compact while simplifying construction.
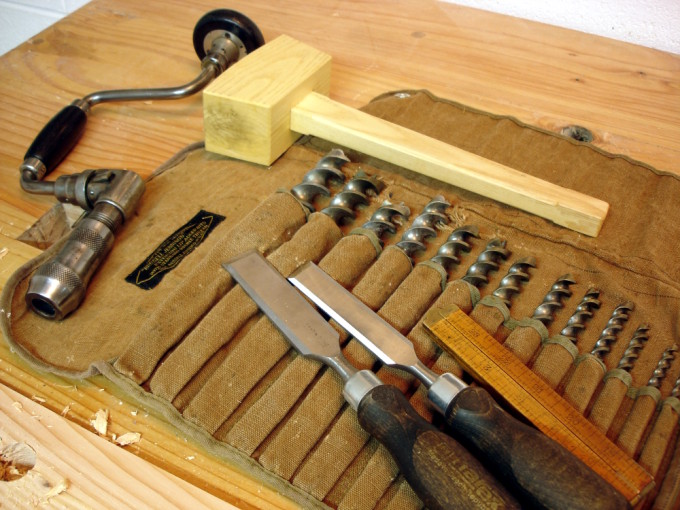
This part of the work started several months ago with tool acquisition. No, I don’t think I’ll ever need huge mortising chisels more than once, so I didn’t look for them. I did look for, and took a good long time watching the market, a set of Russell Jennings double spur auger bits. A set of these pops up on eBay about every 4 days. A set is 13 bits ranging from 3/16 to 16/16. They are packaged in either a 3 tier wooden box or a canvas roll and date to sometime prior to 1944 when Stanley bought out Russell Jennings. The eBay offerings are often missing one bit and range from mediocre to almost unused condition. Prices vary accordingly and are remarkably predictable if you watch for a while. I waited until I found a complete set that needed only a little cleaning and was lingering around with no bids. My one bid brought it to me at a price I clearly liked. Overnight in some white vinegar cleaned the bits up to near new condition. All were sharp. The smallest was a bit bowed but easily straightened. The chisels in the photo are Narex bench chisels, great value at an affordable price. The mallet is shopmade from black locust.
The uprights / legs are 5 inches by 3 inches in cross section. The feet are 3 inches by 3 inches in cross section. I’m not a tenon engineer and don’t know the optimal size for this application, but I decided to make the tenons 1 inch by 3 inches in cross section, and of course three inches long. Mortises first, or tenons first? I did the mortises first. If one were to do a lot of these, a great big 1 inch mortise chisel would be the tool of choice.
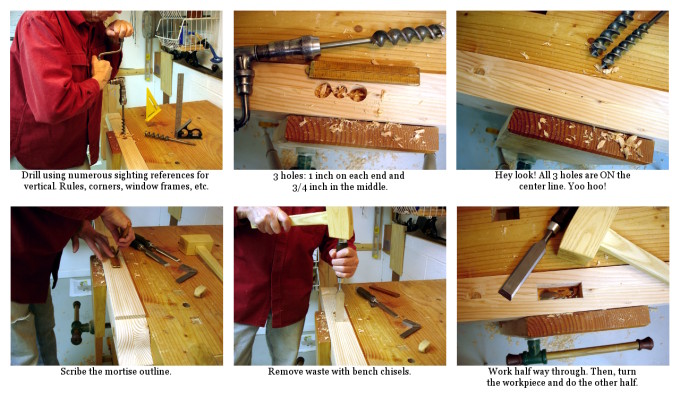
I don’t think I’ll be making many more, so drills were my choice. Layout was easy since the centers could be placed on the lamination line. Just find the center of the workpiece and layout the 3 inch extent of the mortise. Drilling by hand, without a drill press, needs a bit of practice and several sighting references. It’s really not too hard to make holes that are vertical within the precision needed. Drilling by hand does have some limitations. One cannot overlap holes as can be done with a drill press. Even getting two holes close together can let the bit cut through a thin wall into the nearby hole and “drift” astray. I drilled two one inch holes, one at either end of the mortise and a 3/4 inch hole in between. When working with spur bit augers, the practice is to drill until just the spur starts to exit the far side of the workpiece. Then, turn the piece over and complete the hole from the other side. This technique makes a nice clean hole with no blow out. Waste removal was now a small enough job for bench chisels. Mark a very clean outline. Chisel away waste until half way through. Turn the workpiece and repeat.
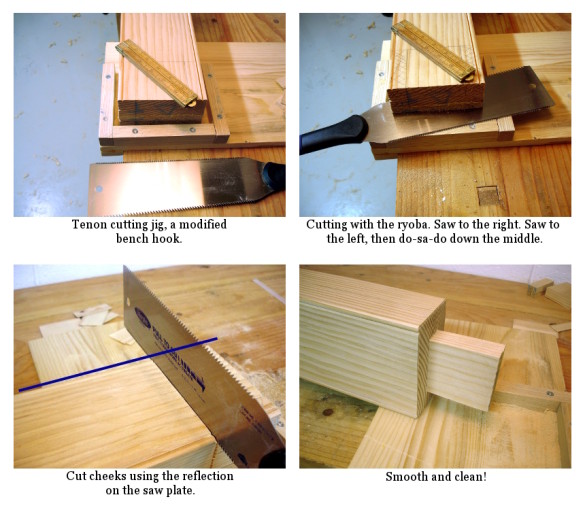
The last large tenons I made were for the stretchers for my workbench. They are serviceable, but not pretty. My sawing skill is slowly improving and I think I can make better tenons than before. Yet, I decided to try a technique that I saw on Steve Branam’s “Close Grain” blog. He did a riff on a Chris Schwarz technique using a simple jig and a ryoba saw. It works well, as the picture shows. I varied from the technique Steve shows by using the reflection technique to make the absolutely square shoulder cuts. Note how the edge of the workpiece reflects in a straight line on the saw plate. I added a blue line in the photo to highlight what to look for.
This cut, by the way, is a first class cut and needs to be very clean. Although I don’t show it in the pictures, I marked the cut with my wonderful Czeck Edge marking knife and then reinforced that marked line with a shallow chiseled “V.” That provides a starting notch for the saw while keeping the edge very crisp.
The ryoba saw is a simple one from the BORG, inexpensive and useful. I saw a question posted in a forum recently from a guy with analysis paralysis on how to best spend $100 for a new ryoba saw. He got no answers while the rest of us are busy cutting up lumber.
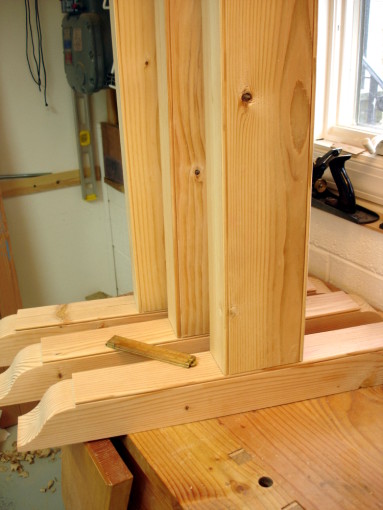
The joints fit together very nicely, snug, not sloppy. They will be completed with hot hide glue and drawboring. Lot’s of people have written about drawboring, so I won’t repeat all that here. It’s simple and it works.


Bob,
Well done! I must agree that the saw from the BORG is a great bargain. The legs look terrific, right down to the bead detail. Now I will be looking for two things: The (wide) chisels, and making a mallet similar to yours.
Al
Your 13 Russell Jennings bits actually go from 1 inch (16/16ths) down to 1/4 inch (4/16ths). I have a set too and they are very well made. I have a Russell Jennings doweling bit that is marked as a 3 (3/16ths) but someone buggered up the spurs when they sharpened it so I’m not sure I will ever get it to work. That is the smallest auger bit I have ever seen – usually they stop at 1/4 inch.
Rick in Oakville
Thanks Al! When you make your mallet, if you make one laminated, do the lamination correctly. I didn’t. The growth rings should be like this: ))((, NOT (()). Mine hasn’t come apart yet, but you need every advantage you can get to manage wood movement.
Rick in Oakville (CA I presume) is absolutely correct. The smallest bit in the RJ set is a #4, 1/4 inch, not 3/16 as I wrote. I once had a math professor who said there are 3 kinds of math students: 1) those who really like math and do it well, 2) those who dislike math and do it poorly, and 3) uuuum, There are two kinds of math students. I’m the 3rd kind, one who really likes it but does it poorly. 16 – 13 = 3 … but that’s not the size of the 13th bit!
I’m in Ontario, Canada, but I understand the confusion – there are Oakville’s all over the place – two in Canada and probably more in the US.
Rick in Oakville, Canada
Hey, nice Bob! I’m glad to see the ryoba tenon put into practical application.
Hi Bob,
I’ve started research on making my own treadle lathe. Do you have any more updates with this project? I’ve got Roy’s plan from his book: Wedge and Edge, plus some of the other references you have listed. I’m trying to decide what to do for a spindle. Roy has you forging you own, but I’m not that interested in metal working. I’ve been looking at adapting a spindle from a Grizzly lathe, mostly because Grizzly parts are easy to find and reasonably priced, plus it opens me up to all the modern attachments.
Hi Bryan,
No updates. I set the project aside last Spring and haven’t gotten back to it. We are thinking about the same. The Stephen Sheppard plans I have also suggest a forged and smithed set of accessories. Since my village blacksmith has a busy schedule until 2012, I have been planning to use ShopSmith parts. Already have a handfull of 5/8″ bearings for same. I’m still deciding what to do about the crank. I’m enclosing my wheel and Roy’s pin in the wheel approach won’t work. Bend a crank of weld one? Dunno yet. The Grizzly spindle sounds as good as the ShopSmith. So, have great time with it.
Thanks Bob,
I saw some ShowSmith drive spurs on Ebay and wondered if I could use them. I’m starting to think about how to mount the flywheel/crank too. I’m not thrilled with the idea of drilling out plumbing parts like Roy. I’m thinking of doing something like this http://www.bloodandsawdust.com/Blood_and_Sawdust/Lathes_Part_2__Building_a_Flywheel_Treadle_Lathe.html (scroll down to the fly wheel) and JB weld a collar onto each plate. I’m looking for something so I can balance the wheel then tighten it up. Seems like the bicycle industry should has solved this problem, but I can’t seem to find the parts I want.