Gratitude: being able to eat dessert first.
Yes, carving is my dessert, and I’m enjoying it. In fact, going purposefully slow drags out the work for more enjoyment. OK, that’s an easy excuse for being a slow carver.
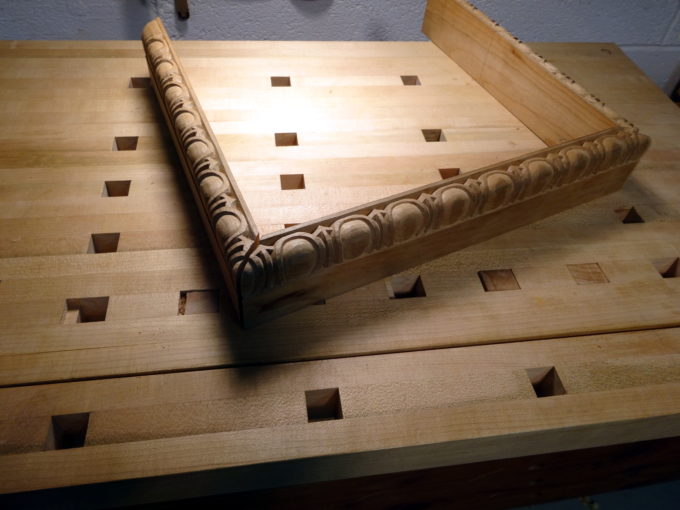
There are now three segments of egg and dart moulding that will be set aside until other parts are done. The side pieces will end up being shortened by about 3 eggs, eggs that I used for “warm up” or practice as I carved.
Details…
Since the last entry, I abandoned those vee-blocks and got a 4 foot long bar clamp to hold the workpiece. Taking a tip from Paul Sellers, I place the bar clamp in the carving bench’s vice and have a lot more flexibility in adjusting the workpiece for the best carving angles.
I laid out two of the eggs a bit wider, only about 1/8 inch, to allow for the miter cuts for the corners.
After carving, I got out the decades old Jorgensen miter saw and tuned it up with some trepidation. It is actually a very smooth running tool, but the incident of a 93 degree miter left me doubting whether to use it. Long story short, after a lot of practice I have learned that the two edges of the workpiece that rest in the miter box must be as close to absolutely square as possible. A workpiece that is out of square by only a degree or two, will result in an unacceptable miter. These miter cuts had to be “right on” because I intentionally left little extra room for trimming to fit. I wanted to get the fit right without long interruptions in grain pattern. Care in the initial squaring of the workpiece really paid off! One joint is virtually perfect “off the saw,” and the other needed only a few swipes of correction to get a good fit.
Next, I think I’ll do the harder of the remaining moulding pieces. The long sticks will be easy in comparison to the mouldings on the edges of boards, which include edge grain moulding runs. Boards next.
Other articles in this series…
- Regulator Clock – Done
- Regulator Clock – Woodworking completed
- Regulator Clock – Scratching the frames
- Regulator Clock – Door Hinged
- Regulator Clock – Case Dry Fitted
- Regulator Clock – Jelly Side Down
- Regulator Clock – Case Frames – 2
- Regulator Clock – Glass – 2
- Regulator Clock – Case Frames – 1
- Regulator Clock – The Works work
- Regulator Clock – Glass
- Regulator Clock – Tongue & Groove planes
- Regulator Clock – Completed Mouldings
- Regulator Clock – Stick Mouldings
- Regulator Clock – Plate Mouldings
- Regulator Clock – Egg and Dart Moulding
- Regulator Clock – Eat Dessert First
- Regulator Clock – original description
- Regulator Clock – Stock Prep
- Regulator Clock – Plans for Moldings
- Taming the Rabbet

This makes my jealous feelings pop out!
One day, I’ll be able to do something like it!
🙂
Additional note Bob, Everything is fine, thanks for asking. I’m overcoming my FFS (fat finger syndrome), got a new (so called) smart touch phone, made a mess (learning new skills) with all my accounts but now I’m restarting. New blog in a few days!
Hi Antonio,
You are able to do it … when you get to the time that you really want to do it.
Oh! Phones are deadly for managing web sites. Hope to see you blogging again soon.
Would love to see your steps involved in carving the egg and dart.
–Wm. Brown
Forest, VA
http://www.LineAndBerry.com
Hello William,
Your furniture is spectacular, and it looks as if you have already done a good bit of carving. Beautiful work!
I followed (somewhat) Mary May’s egg and dart technique. My variances were mostly in the sequence: all the darts first, then all the eggs. (See the previous post for basic profile prep and layout.)
Disclosure: I’ve known Mary May for a number of years, helped her design and launch her online woodcarving school, and maintained her web sites for 4 years. Almost everything I know about woodcarving is thanks to Mary. I have absolutely no financial interest in recommending her school.
That’s beautiful, Bob. I’ll bet the mitering cuts were hair-raising! It would be such a shame to get them wrong and ruin some carving.
Thanks Matt.
Yes, I approached the miter cuts carefully, but with confidence. The confidence came from a number of practice cuts while tuning up the saw. What you don’t see in the pictures are a doubled strip of tape along the bottom of the miter box’s vertical fence. That removes about 1/2 degree of built-in error / slop. Nor, do you see the ends of the side pieces where several practice cuts helped in getting the saw set up correctly. By the time I did the 4 real cuts, I had already done twice that many getting ready.
Your adventures in mouldings are coming along well. Since my next steps are profiles cut on the edges of boards, I won’t get to this next point until I do the sticks, which have deep coves. You’ll probably get there before I write about it.
But, I’ve already learned a lesson about deep coves. For profiles approaching 90 degrees, or going 90 degrees plus additional depth, the typical guiding rabbet doesn’t work well. Its span will be beyond the span of the plane. Instead, use stepped rabbits. If you have Matt’s book, see pages 67-71.