You just picked up that old eggbeater drill. Looks nice. You look into the chuck and think “Oh no, looks worse than someone who’s been using their teeth to loosen axle nuts. She’s a gonner.”
Maybe not…
My entry about refurbishing a Goodell-Pratt eggbeater drill has had more comments than any other article. Questions continue to this day, with several asking about the chuck … and can a chuck with skewed jaws be salvaged? My experience is that the most common problem with these drills is mangled springs in the chuck. I can’t know how they get so mangled, other than knowing that they are relatively exposed and are probably caught and mangled when people aren’t careful enough in setting bits into the chuck. The answer is a resounding yes, IF (big IF) all the jaws are present. Most of the chucks of the eggbeater era, Millers Falls, Goodell-Pratt, and other brands, had 3 jaws. Count em. If you have three, let’s break the chuck open and fix it up.
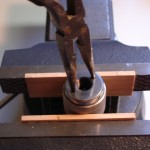
There is a bottom pieced screwed into the chuck. Mine was rust free and opened rather easily. Your experience may vary. If needed, use a good penetrating solvent and lots of patience. I clamped the chuck into a machinist’s vise using pieces of softwood to prevent marring the knurling. I used only enough clamping pressure to keep the barrel from turning, and to avoid distorting its shape. My chuck had two very convenient holes in the bottom, and there’s probably a spanner tool out there somewhere that fits those holes. A pair of needle nose pliers did the job for me. Other chucks might not have these holes, or might have flats for wrenching. There’s a lot of variation. You may need to use vice grips or plumber’s pliers to open the bottom. Whatever you use, try to employ some padding and be gentle enough to avoid marring the piece.
(Click on any picture to see a larger version.)
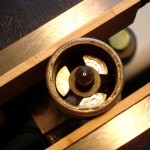
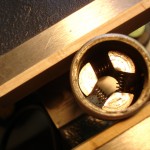
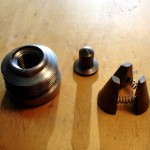
Once the bottom is removed, you will find a thrust washer or some sort of device that is used to push the jaws into the barrel as the chuck is tightened. Lift it out. Then, we can see the remaining parts, the jaws and the springs that hold them apart. Of course, here we see a nicely arranged, well functioning set of jaws and springs. This is what they should look like after you finish refurbishing.
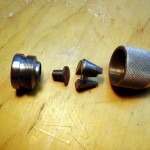
OK, let’s spread out the parts.
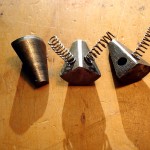
The leftmost picture shows the parts laid out in a line as they normally fit together. The center picture shows each part rotated 90 degrees counter-clockwise to give you another perspective. The rightmost picture shows the jaws, with one flipped to show the surface that mates with the inside of the barrel. Again, these are all of a working chuck. Yours will most likely have some really ugly looking springs, mangled twisted things that are the root cause of your chuck’s problems.
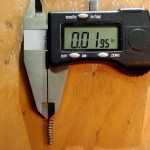
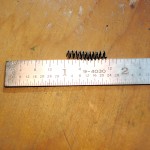
Let’s make some new springs. The first thing you’ll need is some spring steel wire of the correct size. As one of the following pictures shows, the springs in this chuck (two are originals) are made of wire measuring 0.0195 inch thickness. I rummaged through some old guitar strings (never throw anything away) and found a steel string that measures 0.0250 (for the guitar’s 3rd string (G)). That was close enough. If your guitar string drawer isn’t well stocked, try a local hobby shop or craft store and ask for piano wire. Otherwise, go shopping on the computer.
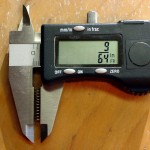
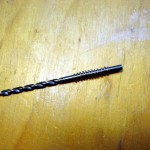
The outer diameter of my springs is 9/64 inch, a size that lets them fit easily into the holes in the jaws. The springs seat into the holes about an 1/8 inch. The length of each spring is 11/16 inch. A good spring fits very nicely over a 3/32 inch drill bit. Note well: there are lots of variations and the measurements for your chuck might vary. In fact, there are at least two different spring mechanisms, and you might have to craft springs a bit different than these. The most important attribute is ending up with three springs that have the same relative springiness. Their balance is what holds the jaws evenly spaced in the chuck.
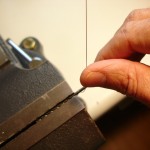
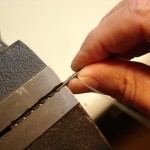
I have no magic for winding springs. I didn’t even look for spring winding tools, as I only needed one or two springs, and don’t foresee needing such tools in the future. (Ooops, failed a basic galoot principle there.) I used a 1/8 inch drill bit (sorry for confusion about this in comments to the original article). I started by making a 90 degree bend in the wire. I then clamped a 1/8 inch drill bit in the machinist’s vise. The tail of the spring wire snuggles up against the bit and we start winding by pushing the free end of the wire around the shank of the bit. ( Kari, I forgot the manicure, yet don’t have any open wounds, like Roy.) Then, I simply wrapped the wire around the bit, trying to keep a constant spiral with the spacing of the original springs. Yep, it took a few tries to make decent springs.
Two suggestions: First, using the 1/8 inch bit, even though smaller than the desired diameter, worked for me because once the winding tension is released the spring expands. Adrian, a commenter to the original article, found that a 5/64 inch bit got him the results he wanted for his springs. Second, wind a length longer than needed, and cut it down to the right length.
Lastly, reassemble in reverse order. A similar article by Andy Seaman suggests using a thin film of light grease as you put the parts back together, and he emphasizes “less is more” with the lubrication. Also, Kirk Eppler, in repsonse to a query on the Old Tools List, posted a few pictures of yet another variant here.
See, you can get the old chuck’s teeth back into alignment. Enjoy your refurbished drill!
Wow, you made your own springs. In my case, all three springs were missing but all three jaws were present. Someone on one of the forums offered the tip that cheap mechanical pencils had slightly smaller diameter springs than ball point pens. The mechanical pencil springs worked fine in my Goodell Pratt No. 5 1/2. The mechanical pencils are the really cheap ones that sell for no more than a couple of dollars. Just another way to go if you don’t have piano wire (well, I do, but it is in the piano and my wife wouldn’t like it if I took some!).
Before I wound my own springs, I had previous tried two ballpoint pens without finding suitable springs. I just now opened a cheap mechanical pencil. The spring is 0.18″ in diameter—much too big. It’s also a bit shy of 1/2″ long, and hence too short.
I suggest that if people are going to talk about using springs from pens or pencils to fix their chuck that they ought to state the precise brand of pen/pencil that they got the spring from. (The dimensions of the springs would be nice too.) That way people trying to fix a chuck would know what to buy. (Note that to wind my springs I bought a roll of stainless steel wire from mcmaster for $9. I didn’t just have it handy.)
I know this is a bit dated, but since Stanley no longer sells the spring kit. I was able to use the springs from 3 Bic Pencils 0.7mm. They came in a 24 pack for back to school they were just over .125″ diameter and .5″ long so it was a nice tight fit, and they work well.
I just bought the Bic pencils and it worked perfect. Thank you so much for the tip. Now I can use my great grandfathers drill. Love it.
One question Bob:
Did you remove the shifting knob with “fast” and “slow” attached to the frame? I can only see one way to do so but I am hesitant. Two peened over knobs rest on opposite ends of the little brass cylinder which can only be ends of a pin. But if I punch out the pin I risk damaging the housing.
Did you remove this when you cleaned your drill?
Thanks,
Stephen H
Hi Stephen,
No, I did not disassemble the shifter. It’s so simple that I didn’t see the need to remove it from the frame. Some WD-40 cleaned up the bearing surface, and I think I hit it quickly with a brass brush to give it a bit of polish.
Best wishes on your refurb.
There is no fixing a chuck with missing parts other than springs. The chuck on 1/4 inch electric drill has a 3/8 mounting tapped hole and most eggbeater drill chucks have a 5/16 tapped chuck hole. Is there a spring type adapter that would fit the two together. Don’t both size screws have the same thread pitch? Having a drill chuck with a chuck key is no disadvantage those friction twisted keyless jobs slip more than their worth. A big P*** inna A**.
This is great, thanks for sharing. I got my Millers Falls No. 5 tuned real sweet now. When I acquired it (for $10 at a little antique shop) it was quite functional and I cleaned and unstuck the slightly crusty innards of the chuck and got it working pretty good. However, one jaw was a bit off and there was a sticky spot or two when opening and closing it. This article had just what I needed to dive in and fix it properly.
Wonderful Otto!
I’m very pleased to hear the article was useful. And I know you’ll get years of joy from that new eggbeater.
Thanks,
Bob,
I received an olde Millers-Falls brace for auger bits. The chuck jaws were opened too wide and the assembly came apart and I cannot figure how to reassemble the jaws and chuck. There are two jaw pieces, one stiff wire with bend that obviously fit in the holes of the jaw pieces, and one chuck collar in addition to the basic brace assembly. Do you have any suggestions on how to assemble these parts? I am appreciative of any assistance you can provide.
Ed – Take the 2 Jaws and lay them out side-by-side with the ‘spring holes/slot’ facing out. Then take the ‘C’ shaped spring clip and insert it into each of the Jaw slots/holes. (when you’re done your jaws and spring should kinda look like a 1980’s era Pac-Man Arcade Character). Now set your Brace into a Vise (use a towel in the Vise Jaws to avoid marring the Brace Finish) with the Round Wooden Knob pointing down to the floor and the exposed Threaded end pointing up. Now very carefully pick up the 2 Jaws and Spring – slip your index finger between the 2 jaws and use your thumb and ring finger to support and keep pressure on the Spring. Now set the Jaw and Spring Assembly into the ‘Slot’ of the Brace with the Spring being on the down side and the Jaws pointing up. Now with your free hand take the Chuck Collar and slowly finagle the Jaws into the Wider Opening of the Collar – you will need to slightly compress the Spring and Jaws to get them ot slip into the Collar. Just as they start to slip in add a drop or two of Singer Sewing Machine Oil (or 3-in-1 Oil) to the mating surfaces of the 2 Jaws and the Chuck Collar. Then while still holding the Assembly in the Brace, slowly push the Chuck Collar down onto the Threads and start threading it onto the Brace. Once you get the treads started, add a couple drops of Oil to the Chuck Collar Threads. Now you should be back in business.
Thanks for the description Bob.
Ed, another thing that might help is these Google pictures of similar chucks.
I have an Orvall 3255 which is missing the thrust spacer that pushes the jaws. can anyone give me dimensions for remaking this part?
Hello Joe.
Good question, but I doubt many people will see it here. I get notification by email, but I think most readers will see your question only if they come back to carefully read this 8 year old posting, or they have searched it out, like you.
Have you tried the hand tools forum (actually called Neanderthal Haven) over at Sawmill Creek? Lots more eyes there.
BTW, I think the item you have is actually an OXWALL 3255. Maybe the brand marking is well worn?
Good luck with it.
Bob, Great article
In the process of restoring one of these drills. Mine is missing the springs (which your article covers perfectly) and the thrust washer or device to push the jaws in the barrel. What can I use or where can I find such a device. Thank you
Hello David,
Hmmmmm? Maybe you can visit a hardware store (with a good selection of loose screws, bolts, nuts, etc.) and find a washer that is a good fit. It needs to be just a bit smaller than the span of the jaws when fully compressed. While the original has an integral shaft to keep it centered, you don’t have that part. Instead, maybe a bit of JB Weld epoxy can either hold it in place on the shoulder of the chuck … or be built up to make a stub that acts as that center shaft. See the second item from the left in this photo.
Good luck with it. When nicely restored, these drills are a real pleasure to use.
Bob and David,
I’ve run into the “thrust washer/plate” issue with a couple of drills I’ve worked on recently. In one, I was was using the cone, jaws, and springs of low-end Stanley egg beater on the bottom piece of a Millers Falls No 5. A dime did the trick.
Not so with an old Goodell Pratt (826, I think). I replaced the springs with help from here, but noticed a place for some kind of missing thrust plate. This time, a right-sized washer or coin did not do the trick. Too much lateral movement. Solution was to build one similar to Bob’s picture. Source: 5/16 (for this drill) hex-head lag bolt with no threads near the head. Take off the corners (1″ belt sander or whatever) to make it nearly round, remove about 2/3s of the head thickness (same tool), and cut the bolt to needed length. Shape the cutoff to taper some so it finds its way back into place on the top of the bottom piece.
Bob, your article and pics were great as are the posts about using the Bic 7mm pencil springs. I’m keeping my old guitar strings for when I need another size.
THANKS Anderson!
Good description. Much appreciated.
Took a bit of googling to find this site but you had exactly what I needed – a source for springs for my No 5A Miller Falls hand drill I found for $5.00 at a community garage sale a couple of years ago. I needed all three springs and I happened to have three Bic 0.7mm pencils. BTW, the #2 Bic pencil uses the same spring which is fortunate as the spring from the first 0.7mm pencil sprung itself from the project and is hiding somewhere in my garage.
Now that I have all the parts I can go ahead and clean it up and put it to use.
Thanks for you and all the other old tool folks that helped me learn about this tool and it’s history.
Hi John,
Glad you found the right springs. It’s good to hear there’s yet another hand drill coming back into service. They’re so enjoyable to use, and a lot less noisy than power drills.
I have my father’s old Goodell-Pratt No. 245 Breast Drill but the chuck is missing the 3 springs and jaws. Based on info above the replacement spring info is very helpful. Is there any source of replacement jaws other than trying to find a replacement chuck?
Hello Bill,
Hmmmmm. Sounds like it came apart sometime ago and those things were lost. Two ideas come to mind:
1. Try eBay. Maybe… just maybe… someone is selling piece parts, or old replacement chucks. I haven’t looked; so I don’t know for sure.
2. Go to sawmillcreek.org, the Neanderthal Haven forum, and ask if anyone has spares. The hand tools aficionados there might have more ideas.
Good luck!
Bill,
Affirming and expanding on Bob’s reply: Sometimes on eBay people sell a lot of 3-5 drills in really rough condition for bargain price, e.g, $15-25. They may look hopeless, but often can be restored or used as a parts source. Unfortunately, matching your GP breast drill would seem to be a low probability, but you might find a chuck or, more likely, a chuck cone and/or it’s jaws that would fit. I’ve found chucks’ threads difficult to match, even from the same company, but have found chuck cones that would fit on the chuck base of a “jawless” chuck. See my comment above re: putting a cheap Stanley cone on the chuck base of a MF No 5. It’s kind of a shot in the dark, but it may work, and you’re likely to come out with couple of drills that can be made to work. (Also, since GP was bought by MF, you may find some MF drills that share parts with older GPs.) Good luck with it!
I have a Yankee 1530A with a chuck problem. Inside the chuck were three jaws and nothing else. The jaws each have a small hole in the bottom and one, even smaller, hole in the middle of the curved, outside edge. The two holes are connected.
Any idea what parts I need?
Hello John,
I have NO idea of how similar the Yankee chucks are to the Goodell-Pratt chucks. Compare what you have to the detail pictures in this post. Some of the holes in your parts are going to be for springs of some sort, but I have no idea of what they might look like.
The best I cab suggest is to search, search, search on Google. I just saw about 60,000 hits there. 🙂 Maybe, if you’re lucky, you can find either some detail pictures or better links to other people who have these tools.
Good luck with it. I can certainly attest to good eggbeaters being a joy to use,
Bob,
Thanks for the reply, I will keep digging.
Worked with guitar string (g).
This is a fantastic post and thread. I’m so happy I came across it. I have an old “hy-lo drive” hand drill and the chuck is missing both the springs connecting the jaws as well as the thrust washer. Looks like the springs are relatively easy to replace. But any idea what I can do to replace the thrust washer? Many thanks
Hi Rodger,
Good! It sounds like you are on the way to refurbishing that drill. Perhaps you can find a replacement thrust washer at McMaster-Carr.
Best luck with it. They’re great fun to use when running smoothly.
I’m so happy I found this. I picked up a troubled Millers Falls 2-AG cheap. I thought the chuck was toast but I followed your instructions and now I have a nice smooth-operating egg beater drill of my own just like I wanted! Each time I pick it up I think of my dad who taught his girls how to use tools and get their hands dirty.
Fabulous April!
Good to hear you rehabilitated another egg beater. Something about them is magic. It’s also great to hear about people (girls or boys) still learning to do things themselves. This great country was built on self reliance, and I am always grateful to hear of people continuing that tradition. Happy woodworking!
Thank you for this information. I got my dad’s Dunlap drill fixed for the price of three cheap mechanical pencils. It had been lying around for years and I had pretty much given up hope of finding parts. I was looking for a replacement chuck when I found this.
Perfect Neil C. !
Happy to hear you could bring yet another egg-beater back to life. Now, go make beautiful things with it.
Driving myself crazy trying to find replacement chuck springs and the best thing that I’ve found on the internet, in years, is your simple explanation how to make them. Managed to pull off .022 guitar string springs in a few minutes on a 1890s watchmakers lathe. Thanks for being here !
Happy to hear yet another egg beater is back in service. Enjoy it Lee.
I do allot with Amish folks here in Missouri. I found a source for most of the replacement springs I need for my breast plate drills. Bob if you want to try a set, contact me. I don’t think they work on hand drills, but the larger chucks on breast drills are perfect. I have never tried on a hand drill.