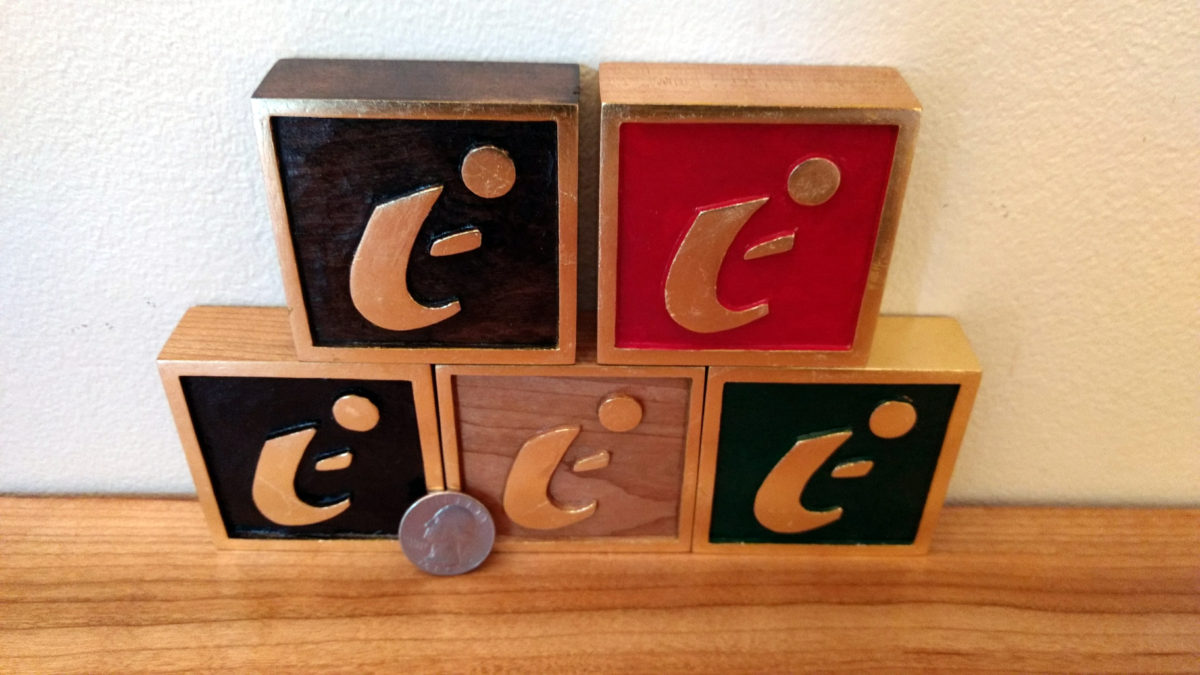
Gilding practice… Practice for a series of signs I’ll show some other day.
The blocks are cherry. The “E” is my wife’s creation from several decades ago. The carving was the easy part. (Carving depth is about 1/8 inch.)
The top left block was ebonized on all surfaces. Three others have painted central panels (Acrylic artist color). Most edges were left natural, except for the top of the green block, which is also gilded.
Gilding is “composite” gold leaf laid over a yellow burnisher-sealer. (Dux brand from Sepp Leaf Products) The burnisher-sealer layer, is actually 3-5 coats of a chalky paint that fills the wood pores and provides a smooth base for the gold leaf, after a good bit of tedious work with 600-800 wet-n-dry paper.
Sign Painters’ One Shot “Fast Dry Gold Size” gets to the right degree of tack in 75-90 minutes.
I’ve learned that the best way of applying the leaf is to do as John does, slide the leaf gently onto the work at an angle. That minimizes the folding, crinkling, and breaking that happens with other methods of applying the leaf. Immediately after covering the entire object with leaf, I place one of the thin tissues from the leaf booklet over the top of the laid leaf and burnish it with fingertips. I hold the tissue absolutely stationary to avoid scratching the leaf. Within a few minutes, I repeat that fingertip burnishing to assure good adhesion. Then, — wait, wait, and wait some more —. The size takes a good 15-20 hours to cure. When the size is completely cured, I remove the excess gold, often with the aid of a stick cut to resemble a small sword.
After gilding is satisfactory (occasional voids patched), I complete with two coats of Dux Clear Topcoat. This stuff is advertised as “water clear” and it certainly is. Pop the lid off the can and it’s like looking into a can of water.
Special thanks to John Eugster who has been writing about the gorgeous carved and gilded frames he makes for his wife’s beautiful paintings.

Beautiful work you did on those blocks, seeing the quarter next to them gives a great perspective of the size. Working that small must have been quite an effort, hard on the eyes I’ll bet. Glad my blog helped with your work — that’s what it’s all about!
Thanks John.
The carving really was the easy part. These blocks are huge in comparison with these little boxwood carvings.
Learning to handle the gold leaf was the hard part, and your tutorials certainly eased that learning.
Hi Bob,
glad you wrote that they were the letter ‘e’. I thought they were an oriental character or something akin to yin and yang. Nice job on the uniformity between them all. How difficult is it to carve those small circles?
Hi Ralph,
The carving was the easy part … and carving circles is incredibly easy. Just walk the tip of the right sized gouge around the circle. Carving is all about practice… practice… practice… and patience.
BTW, that “E” is not new on my blog:
recently: https://www.bob-easton.com/blog/wp-content/uploads/2016/10/chinese-seal-box-6.jpg
33 years ago: https://www.bob-easton.com/blog/wp-content/uploads/2008/05/d-froggy.jpg
great job Bob. I haven’t had the chance to do any gilding in my current job. Maybe one day I’ll expand into that area of sign making. I would love to do a gilded sign, even if it’s just for myself.
Look forward to seeing the finished sign in a future post.
Thanks Bill.
I´m sure you will enjoy gilding when you get the chance.
It looks great!
And you explore totally different techniques for applying the gold leaf that I’ve never heard. It good to know about different approaches!
Thanks Antonio,
Yes, there are two basic techniques for laying gold leaf. Both are very old, but use slightly different materials.
One technique is generally called water gilding. Immediately under the gold is a layer of gesso, then boule, a clay based substance. Lastly, water with a bit of gelatin is used as the ¨size¨or glue.
The technique I used is called oil gilding, named after the size being oil based, similar to a varnish. Immediately under the gold is the burnisher-sealer. Then the oil based size is used as the glue.
Those are very simple descriptions of the differences between the two techniques. We really need some one far more experienced than I am to tell us more.
Nice! The scale is impressive, especially in cherry. All of the cherry I have worked with (not a lot) has tended to be prone to fracturing.
Applying gold leaf seems to be an art form in and of itself. I know nothing about it other than the appearance of the finished product. Yours looks very well executed.
Thanks Greg,
Cherry has worked pretty well for me. Yes, there are variations from piece to piece, but on the whole it is a pleasure to carve. For me, walnut has turned out to be more cantankerous, easier splitting.
The gilding has had a long learning curve for me. There are many ways for it to go wrong, and I’ve explored a lot of them. 🙂
P.S. Like watching your progress with the lathe. Keep havin’ fun!
Hi Bob,
Real nice carvings. I always wanted to give carving a try. Maybe a shop sign or such. Unfortunately I didn’t find the peace until now.
Anyway. I’m clueless about gilding. But the result looks really good.
Best,
Stefan
Thanks Stefan.