The tool rack behind my bench was infested earlier this year by a deluge of carving chisels and gouges. As they arrived, all the rest of the tools scrunched together and made room. Nice, friendly tools. 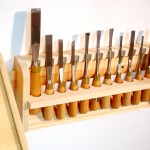 No, there are no wall cabinets, tool chests, or stacks of drawers in my shop. Tools kept in open racks are a lot easier to find and are quicker to come to hand. There were good intentions to build special racks for the new gouges and chisels, but other things (like learning to use them) came first.
While collecting about a bizillion pictures of chisel racks, one particular design caught my eye. This kind of rack will be at home sitting on the bench, or hanging from a French cleat on the end wall of the shop. The person who posted the pictures did not mention dimensions, but they were not hard to determine. A few sketches were useful for coming up with dimensions that ensure the tools don’t slide out and crash onto the concrete floor. The key to these racks is a “floor” piece that sits at a 45 degree angle. The rest is so simple that real plans aren’t needed. Most parts are made from either 1×3 or 1×4 standard lumber … and from a few 1x? pieces from the cutoffs pile.
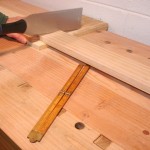 OK. Let’s get started. Measuring things with rulers and other such devices can introduce all sorts of errors. (How many times have you misread a ruler?) So, I tend to use as few actual measurements as possible. This rack has only a few specific measures. The end pieces stand 8 inches tall. The long pieces are all 17 and 1/2 inches long. The bottom of the lower shelf is 3 and 1/2 inches above the bench. The holes in the shelves are on 1 and 1/2 inch centers, starting with the first 1 and 1/4 inch from one end. Everything else is measured directly from the components … and a randomly selected jar cap.
Only two pieces are actually measured for cutting, one 8 inch end piece and one 17.5 inch long piece. All the rest are cut using theses pieces as the measure. Since I use a pull saw for almost everything (I’m not a cabinet maker), my bench hook is hooked from the back side of the bench.
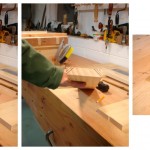 The tilted base sits at a 45 degree angle. It is made from a 1×4. The French cleat also needs a 45 degree angle.It is made from a 1×3. So, several edges need to be cut to 45 degrees. Use the bandsaw? No, it’s messy getting it setup to cut right at the very edge. Besides, using hand planes justify needing power from Milky Way bars. The work is actually very quick with a cambered blade in the jack plane doing most of the work. Get out that ole plastic triangle that’s left over from a freshman engineering course (50 years ago). Mark, rough plane, and follow up with one or two passes from a smoothing plane. Like my shooting stick? I’ll make a real one someday.
Click on the images to expand them.
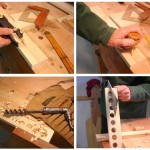 The rack has two shelves with holes in them. Make one stick. Drill a series of holes in it. Cut it in half (almost.) The layout line is actually 1 inch from one edge of a standard 1×3. The holes are 1 inch in diameter, made with an old Stanley bit brace and an auger from an ancient set of Russell Jennings bits. The extension lips needed a bit of gentle honing to remove what looks like a collision with a screw or nail. (Previously owned bits!)
A secret to success with these fine double threaded augers is to drill only partially through the lumber. Then, flip the piece and drill the remainder from the other side. This prevents the “blow out” that happens if one simply drills straight through. I prefer to use the leg vice to hold the workpiece. Two reasons. One is so I can reach underneath to feel the tip of the bit breaking through. The other is to prevent splitting. (Experience!)
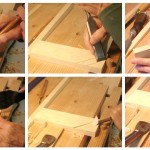 Turning to the end pieces, there is a through dado for that 45 degree floor piece, and a couple of short stopped dadoes for the shelves. Layout used that 45 degree drafting triangle for one mark. Then, the actual lumber pieces were used for the remaining dado outlines. I set my shopmade router plane to the final depth I wanted (about 1/4″), and used it to mark the edges for depth. Thanks St. Roy for that tip! Pencil layout for the 45 degree dado was followed by substantial knife layout (using one of Bob Zajicek’s superb Czeck Edge knives), and then by chiseling a fine wedge on the waste sides of the lines. This produced a groove for the saw to track. Even a whippy pull saw can track a groove like that. Saw to depth. Use a bench chisel to zip out most of the waste. Complete with the router.
The short dadoes were simply chopped and pared. All of this work was at a comfortable height using the BOB.
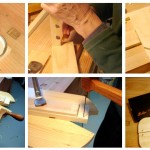 A nicely rounded corner completes the end pieces. Measure? Use a compass? Naw, grab something round. Then use one of my favorite tools, a shopmade turning saw, along with a gigantic bird’s beak sawing fixture. Wow, that saw is a pleasure to use! Unfortunately, I need to follow up with my least favorite tool: sandpaper.
The racks that inspired this build have no visible screws or nails. Maybe the builder used only glue? With each rack capable of suspending several hundred dollars worth of sharp objects above a concrete floor, I want a little more than glue. Out comes the Goodell-Pratt eggbeater and the Fuller countersink bits.
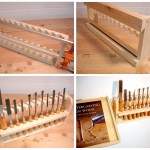 A couple of clamps hold pieces together accurately while screws are used only enough to mark where pilot holes need to be drilled. More beating with the eggbeater, and it all goes together neatly. Now that the basic rack is built, a piece of cleat is measured against the rack, cut to fit, drilled and attached. The same routine goes for a strip at the bottom, which keeps the rack vertical against the wall.
Perfect. It fits nicely right next to my shop desk, which also rides on a French cleat.
The title of this posts uses “racks,” plural. Yes, there are more to come, and more French cleat runs on that wall.
… and for the guy who asks “Shouldn’t chisels be stored with the sharp ends down?” I’m going to find where you live and seal up your garage door with your car inside … just so you don’t hurt anyone with it.
Here you have it: I once had the question, why are the (metal)posts of the hay cart higher than the fence? The guy who took over from me found out why within five minutes. Why no fence?
Thanks for stopping by Damien. You have an interesting series of articles about open toolboxes.
That said,…. It has been a very long time since I’ve been on a hay cart. So, I don’t quite get your point, but I assume it has to do with sharp edges pointed up. Be careful with your hay cart.
I think Damien’s point is that you only have to use the chisel rack to understand why the chisels are stored sharp ends up.
Nice work, Bob!
Thanks Tom!
That’s what I thought too … but the part about the fence introduced some doubts.
It’s a GOOD thing that hay carts don’t have fences. When I was a scrawny young teen, I thought I could earn some money with a hay baling job. It took only a few minutes to discover that hay bales weighed almost as much as I did (then) and that the edge of the cart was very high. 🙂
Bob,
Sorry about putting too much in one sentence. I was confronted with one flawed cart fence with its posts sticking out. A design that was probably inspired by a protective fence. Working standing over it seemed dangerous to me and was nearly tragic for someone else.
Back to chisel racks, Jim Tolpin shows in his last book (The new traditional woodworker) his chisels stored with the point up (so it’s OK 🙂 but in his case the points are covered by a high rack – tray.
Apart from these design considerations and as already said by TJH, nice work.
Bob-
Great post! i’ve been searching for a chisel rack I liked. Also collecting pics.
I’ll be building this in the near future. I’ll let you know how I make out.
Thanks!!!
Glad you like the idea Chris. Post pics when you’re done.
so, I am renting an apartment with a dishwasher. The question is: do you load the cutlery rack with the knife points up or down? : D
by the way, Bob, thank you for your handdrill tips (from so long ago)! I finally chose a Stanley hand drill with a happy yellow flywheel that I love. I drill many holes into old wooden frames for eye hooks, into oyster shells and wampum. Wampum takes FOREVER. I do not know how they drilled those long belts without power drills.
Good to hear from you Christina! … and happy to know you found a nice eggbeater drill. Keep makin’ beautiful!
Old post, I know, but hopefully this will be seen. I have a question – I actually built one of these tonight, so maybe I answered my own question (it works anyway!) but, what is the front to back distance between the stopped dados? In the final pictures it looks like there is about a half inch of lower shelf sticking out, which would put the dados a half inch apart. I put mine that far, and, as I say, it works, but I would like to verify that one dimension. Other than that, great build, and thanks again for the inspiration! I had seen this a long time ago at the site where you you found it, but your description of the build is what made it so I could build mine!
Hi David,
You estimates are right on.
My end pieces are 2 1/2 inches wide. The lower, retaining, shelf is 1 1/2 inch front to back and extends exactly the 1/2 inch you observed. That shelf has dadoes of 1 inch. The upper, resting, shelf is 1 inch front to back, flush against the back edge, and has 1 inch dadoes.
Enjoy your new chisel racks.
Hey, Bob,
Thanks! If I got it right it was mostly due to your excellent combination of description and photography. I was so pleased to see chisels in it, even before I glued it up! Now to make a few more!
Thanks so much for all you do!
David Taylor wrote about building the first of a set of racks he wants for about 70 tools.
Here’s what he had to say about the photos he sent along. (click images to enlarge)
That last matches the “tag line” under David’s email signature: “Learn Relentlessly.” That’s a great prescription for a happy life!
Keep havin’ fun David!
Bob,
Wow, I can’t thank you enough for posting that! I will remember to send photos of the last one, when I get it built, and we can see how much improvement practice makes 🙂
Off to the shop to start Number two, and continue hand planing Rock Maple for my Bench on Bench build!
Thanks so much!
Hi Bob
Nice design. I was able to take this design and customize it for my collection. So far I have made 6 and 3 mount on the wall with three more attached to them so they are staggered and don’t take up much space. Also allows for growth of my collection. It is a work in progress and still evolving, but this design is the best for most sizes and handle shapes that I have seen. (can’t seem to attach a picture here.)
Anyway, thanks for posting this. I found it through the picture while browsing google.
Take care!
Dorian
Hi Dorian,
Good to hear the design works for you.
If you would like, I can update the post with a picture of your work. Just email it to me: bob at bob-easton.com
Bob. I just received my first set of gouges and was about to embark on the usual drill where you scrounge all over the web for designs. Fortunately I came across yours right from the Get! I’m stopping the search right here with your rack. Just what I envisioned with the hang up or pull onto bench aspect. Bravo!
Hello Fred,
HAPPY Carving!
It’s an old post of yours I just found, looks like just what I need to corral carving chisels when I’m using them on a project! Laying them on my BOB or the sides of the main bench results in them rolling around or worse, edges touching. I keep them in a chest until they’re used for a project or frame. I’ll make a french cleated holder to use as needed. Thanks Bob
Good to see you here John. I enjoy seeing the frames you make.
Like you, I often have quite a few gouges on the bench at one time. So far, no problems with edges damaging each other. Yet, I did go to a bit of work to flatten 2 sides on the round handled tools to keep them from rolling. Rolling off the bench and kissing concrete was more bothersome than rolling into each other. 🙂