Long ago, more than a week ago, I cut two large triangles of plywood for the deck and leaned them against the shop wall. If you are ever going to to this, make sure they lean in the direction that imparts a curve sympathetic to the curve of the deck, not the opposite. Don’t ask why I suggest this.
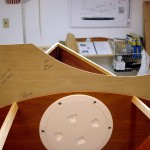 One of the first things to do after turning the boat over is to make a template with two curves, one an 18 inch radius, the other a 30 inch radius. It’s always good to have some 1/8 inch Luan plywood, other wise called “door skins,” on hand for patterns and templates. The template is used as a quide for shaping the top edge of the sheer clamps. The small radius is for the fore deck, the larger for the aft. Space between is a rolling bevel that joins the two. The intent is to provide a flat landing surface for the deck, one that helps the deck fit neatly and maximizes the faying surfaces for glue contact. A super sharp block plane (1897 version) makes quick work of this step.
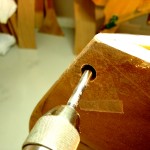 Ah, but before we close up the hull, let’s make a couple of holes in it. Yeah, I know. I’m adverse to holes in hulls, but these are different. They are ones that will never admit water. I like to use painters on my boats. They make it very easy to tie the boats to either the truck rack or something near the water. One of the reasons for making the false stems and burying them well was to provide solid timber for the painter holes. Forstner bits are fabulous! Start drilling from one side. Get the axis established. Then use a 1/16 inch pilot drill to poke through and establish the center that enables drilling from the opposite face. Voila, perfect, clean holes. Doing this now, before closing up that part of the boat makes it easy to ensure the holes won’t admit water.
Another name for stitch-n-glue construction is “tortured plywood.” The deck goes on in two parts. The aft deck is easier because the top of the bulkhead is a large radius and the plywood needs little torturing. So, under the prescription of “eat dessert first,” I did the easier deck first. The underside of the deck gets a clear coat of epoxy rolled on. Then, before it cures much, thickened epoxy is applied to the sheer clamps, the top of the bulkhead, the tops of the knees, and the carlins, every surface the deck will touch. Then the deck is flipped “jelly side down” onto the boat and fastened with ring nails every three inches. Ring nails are copper nails with rings cast onto their surface. Once pounded into place, they are very resistant to being removed.
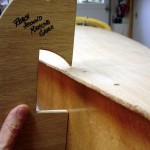 Of course, all of this happens after carefully pre-fitting the deck and accurately marking every nail hole to within 1/256 inch tolerance. The challenge is knowing where to mark when the deck lumber is oversize (to be trimmed later) and the target for the nail is only 1/2 inch wide and invisible when marking. The helpful tool is the reach around marking gauge which is used to transfer the edge line. Mark the edge line, then mark a point 5/16 of an inch further inboard. One is then lucky to finally place the deck to within 1/4 inch of the fitting position. (Actually, 3 pilot holes and some brads helped with that.)
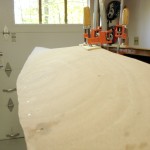 The forward deck is more tortured. The bulkhead has a much smaller radius producing a barrel like rounding. This rounding is counteracted by sheer lines that want to be smooth and flatter. Sitting in the boat, one sees the sides of the deck rise up to the barrel shape at the bulkhead and then swoop back down to near flatness before taking a short upward curl at the bow.
 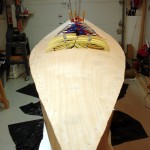 Pre-fitting this deck entailed strapping it down in three places to mark the edges and nail holes. Installing it entailed abandoning many of those careful markings as the nailing proceeded. You see, three tight lashings is not a sufficient substitute for actual nailing every three inches, and the wood flares in interesting ways when tortured.
The forward deck meets the aft deck in the middle of the cockpit area. Making this join is a matter of sawing through the overlapped pieces with a very thin kerf Japanese pull saw. Simple!
No nails into the carlins. They are too scant. Simple epoxy bonding does the job, along with a lot of clamps, a couple of which are providing further torture to flatten a dimple. We’ll see what the morrow holds.
Two decks, four glue mixings, lots of banging and “talking to the boat,” made for a torturous day, more I think for the builder than the boat.
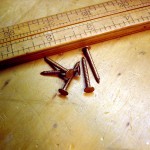 An update for Larry and others who have not yet enjoyed using ring nails. They are intentionally tenacious. Once in, they hold. They can be extracted from soft wood, but bring the surrounding wood with them. When used in hardwood, extracting them usually means pulling the head off and leaving the nail in the wood. The heads are thin and two blows with a wide nail set will leave the heads nicely flush with the surface of soft wood, perfect for attaching decks. The ones shown here are #14 by 7/8 inch. Yet another form of torture (when they miss their mark).
Your boat build is fascinating. Much vocabulary that I don’t know but it’s fun to follow along as I eat Snickers bars. Acquiring energy is woodworking too, isn’t it? When I saw the photo of your “reach around marking gauge” I wanted to whack my forehead with the palm of my hand. What a great idea. You also had me surfing for pictures of ring nails. Thanks.
Cheers — Larry
Being a strong advocate of Snickers powered woodworking, I’m right in there with you Larry.
I’ve updated the post with a picture and description of ring nails; just for you.
I’ll also show another method of reach around marking in the next post about the boat.