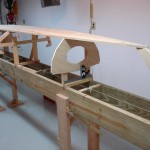
The outside temps are up for a couple of days, making it easier to get the shop to 60 degrees. The bottom is now glued and screwed in place.
Eva Won
Preliminary Setup
 One of the traditional milestones in boat building is having setup complete. That’s when the backbone components can be assembled on the strongback or building jig. It’s the point where basic structural work is done and planking begins.
Almost there … almost because this step needs some epoxy work and the shop is a bit too cool for that now. Maybe there will be a warmer day soon.
A sense of scale can be gained from noticing the try square resting below the first bulkhead. It’s easy to visualize the planking. Note the three flat facets on the bulkheads and the mid frame, and the three lines on the stems.
Those warped bulkheads have now been wrestled into flatness. After the legs were attached and then screwed to the strongback, they were still wapred. Using 4 clamps per station to force the edges into the proper alignment, I pilot drilled and screw attached the bottom. That straightened out the warping. It’s holding now. We’ll see how long that lasts.
Stems
The stems were rough cut on the bandsaw a long time ago and set aside. They needed bevels on the leading edges. That turned out to be very easily done with an ancient, but very sharp, Stanley spokeshave, about 15 minutes each.
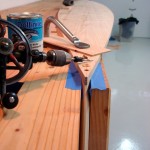
 The finicky work was getting them properly attached to the bottom. They need to be exactly aligned on the center lines, exactly positioned with the 1/8 inch ends of the bottom board, and fastened with two screws each. Holding the parts in the correct relationship while drilling pilot holes is critical. Here’s where the long workbench really shines. Clamp one stem in the face vise. Clamp the other stem to the apron way down at the other end of the bench. A holdfast does that just right. Position the bottom over the edge of the bench, properly aligned on the stems. Hold in place with a holdfast (and a bit of iron weight). Drill, apply bedding compound, and screw. Flip end for end and repeat.
A little bit about screw fastenings for boats… Silicone bronze screws are recommended because they are corrosion resistant, and because by calling them “Marine” fasteners, they can be sold for three times the expected price. They are moderately strong, but also brittle. They are intended to hold things together, not “bring things together.” They are not like drywall or deck screws where “keep on torquing” will often tightened misalinged parts into tight compliance. Try that with these, and the reward is a quiet snapping sound … and soothing words of your own choosing.
The best technique for using silicon bronze fasteners is to ensure the parts fit very well together, clamp the parts into their proper position, drill pilot holes, best done with “Fuller bits,” and then apply the screws. Relieve clamp tension and pronounce soothing words.
Repair ability is a desireable trait, and the best screw head for repeated use is simple slotted. All of the cross-point and internal wrenching designs are too easily munged, cammed, or otherwise made useless. Simple slots have worked for centuries and require fewer soothing words.