A few new cedar flitches are acclimating themselves to the shop. In the meantime, I’ve been busy preparing a saw that will be used to get planking out of that cedar. This saw’s main work will be resawing, slicing thickness from roughly 4 quarters to pairs of roughly 2 quarters boards. Getting two boards from each flitch is the goal. Most people would use the bandsaw for this job, but mine is good for only 6 inches of resaw capacity, and some of these boards will be from 8 to 10 and 1/2 inches wide. I would rather have a good hand tool method than invest yet more in the band saw.

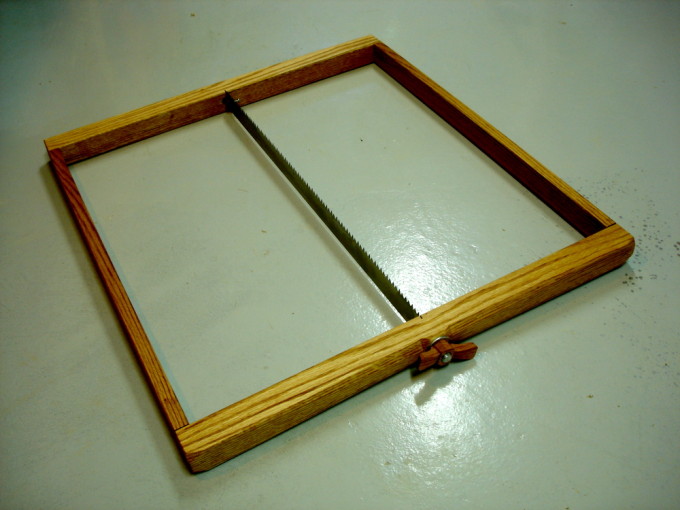
This frame saw derives from Josh Clark’s “Making a Frame Saw” article. I used red oak, 1 and 1/2 inch square, for the stretchers. The arms were gotten from a piece of the same oak, resawn to half thickness. The blade is also 1 and 1/2 inches wide. I found it at Frog Tool Company in Dixon Illinois. See the update at the end of the article.
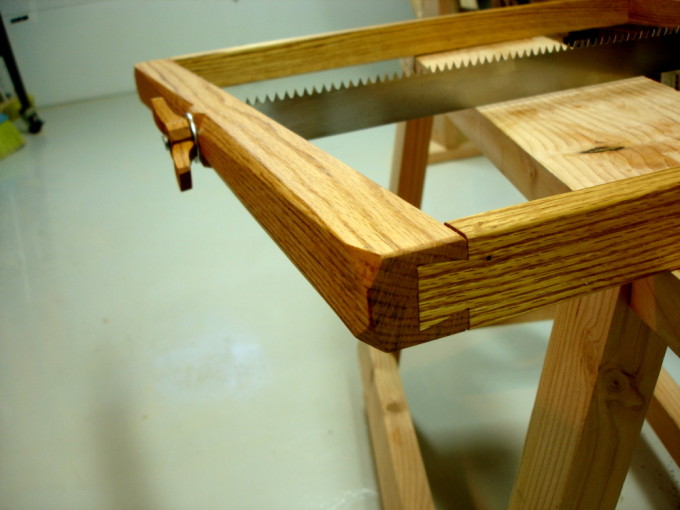
As Josh suggested, I used half-blind dovetail joints. While I’m skeptical that the forces on the saw actually need this kind of joint, I saw it as opportunity to learn to do them. First time doing dovetails. I cut the tails on the arms first and did a couple of practice pockets on scrap wood. Then, did the real ones. Each one gets better, and yes, that’s the last one that’s shown in the picture. All are snug enough to require gentle tapping to assemble. No glue used so far. (Note from several years later: These joints are still not glued or screwed. The tension from the saw keeps them firm enough for constant use.)
All edges are chamfered, because I imagine I’ll spend quite a few hours using this saw. I’m an Art Deco fan, so the upper arm has a series of stop chamfers in an Art Deco motif, and a wing nut to match. The wing nut is simply a wooden shell covering a 3/4 inch metal nut.
The first cut, on a 7 inch wide board, shows the saw will indeed do the job well. Planing will be needed to smooth the cut surfaces, but that was expected. Now, all I need to do is figure out how to hold a workpiece that’s 16 feet long.
IMPORTANT NOTE: After using this saw for a couple of months, I came to dislike the blade. I acquired a good old Disston 26 inch saw, changed it from 7 TPI to 4 TPI, sharpened, and hacksawed to a 2 inch width. That replaced the original blade an made a huge improvement in how well the saw works.


Did you get the “For fast cutting rip or crosscut” blade from Frog? Did you need to make any modifications to the set of the teeth? I’m still searching for an optimal blade for resawing.
The largest piece of lumber I ever resawed was a 17″ wide piece of walnut 34″ long. Not an enjoyable task. I would imagine cedar would go a lot quicker than walnut, although resawing enough 16′ long planks to make a boat is still quite an undertaking.
Thanks very much.
That’s a big chunk of walnut!
Yes, I got the blade you mentioned. I’m not especially pleased with it for this purpose. It is actually a crosscut blade, and a compromise crosscut blade at that. Click on the second picture to see a larger view of the blade’s teeth. They are cut very close to 30 degrees and are symmetrical, not at all the usual triangle shape. They also have fleam filed into them, again something near 30 degrees. The fleam is on both sides of each tooth, making the saw bi-directional. It will cut on either the push or the pull. The set is modest and not much of a factor in how well the saw works. The result is a nice smooth cut, but one that’s slower than what can be done with a rip saw
Further experimentation finds that an old Disston D-8 handsaw cuts a good bit faster. As I described in the post about resawing boat lumber, Harry Strasil suggested using a blade cut from an old rip saw. He prescribes a 90 degree tooth filing, no fleam and very little set. Using Harry’s suggestion will result in a blade that’s a little easier to use than the standard rip saw, from being less massive, and more easily controlled from being in the wide frame. It sure sounds like experience speaking and I’m ready to try it.
Thanks, Bob. I have neither the capability to cut an old rip saw blade down, nor the patience to learn how to sharpen saws right now. I was hoping there might be a good ready-made solution. Good luck with your resawing.
Bob, Great saw and very inspiring. Can I get a little more detailed info on how exactly the blade fits into the frame on the end with the knob? I know there may be a u-shaped pin holding the frame onto the threaded bolt, which is sliced down the middle and drilled. But where is all of that – is it within the frame? If so, is the slot for the saw cut 1/2 way through the frame, and the other end bored 1/2 way through the frame from the other side? Thanks for your help.
Eli
Eli,
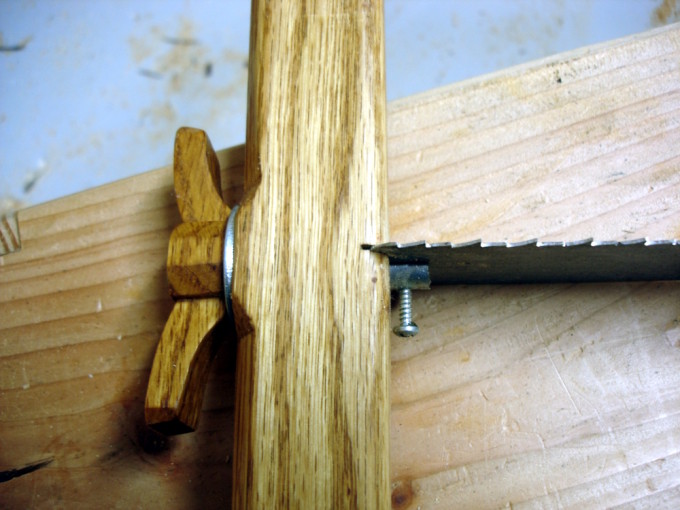
There are no u-shaped pins, and nothing hidden inside the frame. On one end is a carriage bolt. On the other is the threaded end of a bolt. Both have a slot cut into them with a hacksaw. The slots are deep enough to allow the hole in the blade to be about 1/4 inch into the slot. A hole is drilled through each bolt. I made these holes 1/8 inch and then used simple #6 self tapping metal screws as the pins which hold the blade. The only thing needed to hold the bolts in the frame is tension provided by tightening the nut.
The slot in the wood simply accommodates the end of the blade and resists blade twisting a bit.
Go take a look at the bottom photo in John Clark’s article. It shows the bolts well if you let your browser zoom in on the full size of the image.
I will add one more close-up picture to this article later this evening.
Hi, Just happened here searching on old tools left by my dad. I’m 74 next month, so I’m sure there must be one or two old enough to be of interest, not looking to dispose of them, I just like old tools. One is a wooden turning saw with the interesting name Johnson [British Made] Gramophone brand tools, but I can’t find a reference to the maker on the net, maybe it rings a bell somewhere?
Regards, Ian C.
Hi Ian,
That brand name is not one I’ve heard. I’ve just searched through (an electronic copy of) 60 volumes of an old publication called “The Chronicle,” which often had discussions of old tools. The problem with that is that The Chronicle was a journal of the Early American Industries Association, and not much mention of UK industries. No hits.
I can suggest one other place to look, if you haven’t been there already. The “Old Tools List” is a mailing list (email format) subscribed to by many people with old tools interests. One can sometimes find obscure answers there.
There is an archive of previous Old Tools conversations at:
http://swingleydev.com/archive/index.php
Or, you can join the list and then ask questions, using the link at:
http://ruckus.law.cornell.edu/mailman/listinfo/oldtools
Good luck in your quest.
Just stumbled onto this site looking for some guidance on making a frame saw. What I see here gives me hope. Mixed reviews on rip saws above for the frame had me looking around. One source I want to investigate further is on the Traditional Woodworker site http://www.traditionalwoodworker.com/prodinfo.asp?number=545-2531 I’ll likely pick up a rip saw blade from them and give this a go.
Has anyone gained any new insight in frame saw design and use in the last two-plus years since the last post?
Many thanks for educating me, and good luck to you all.
Hi Ken,
It looks like you’ve found a decent blade. I didn’t see that one when I built my saw, but it looks like a great way to get outfitted.
As for advances in design, what can one expect of a thousand year old tool? 🙂 You’ll likely find many variations on the basic hardware, from simple home center hardware, to very fancy custom forged stuff. (See this link.)
Pick a design you like and build it. With decent blades (DON’T be tempted to use bandsaw blades!), they all work. As for use, do some google searches for resawing.
Have fun with it.
Bob: Some follow-up to our discussion above. Developed a quick prototype of the frame saw, built around the 24″ rip saw blade offered by Traditional Woodworker at http://www.traditionalwoodworker.com/prodinfo.asp?number=545-2531
If I could upload a photo of the saw, I would do so. I added a chunk of wood to the hand piece to better seat the blade, and will do the same for the forward seating point next go round. In any event, the saw blade, once seated and tensioned works marvelously for general ripping and re-sawing, with much greater control than I ever expected. This is a VERY good addition to my galley of saws. Fun little project. Will get a 24″ turning blade from Traditional Woodworker and see how that pans out.
Hope all had a wonderful Christmas and that 2013 is the best ever.
Ken